Integration Notes
Helpful notes about configuring and using various integrations.
Tesla
You'll find several Tesla integrations available in the Settings > Devices & Services > Add Integration page. Here's a brief comparison to help you pick them:
- Tesla Fleet - Integrates with your Tesla Vehicles. Also supports Tesla Solar/Powerwall. All communication done through Tesla's cloud API. Provides only high-level solar sensors, but allows sending requests to cars. (Setup Docs)
- Tesla Powerwall - Integrates with Tesla Solar/Powerwall. All communication is done locally with your Tesla Backup Gateway. Provides much more fine-grain solar and battery sensors.
- Tesla Wall Connector - Integrates with Tesla Wall Connector / Charger. All communication is done locally with your devices.
If you have Tesla Solar, I recommend you use the Powerwall Integration so that your communication is done locally and you get all the extra detail. You can install all the Tesla integrations at the same time if you want to connect your Solar, Cars, and chargers.
Configure Energy Dashboard
Dashboard Configuration is under Settings > Dashboards > Energy
The following lists which sensor you should use for the various Dashboard energy settings.
For Tesla Powerwall/Solar
- Electric Grid
- Grid consumption: My Home Site import (sensor.my_home_site_import)
- Return to grid: My Home Site export (sensor.my_home_site_export)
- Grid consumption: My Home Site import (sensor.my_home_site_import)
- Solar Panels
- Solar production: My Home Solar export (sensor.my_home_solar_export)
- Home battery storage
- Battery systems
- Energy going in to the battery: My Home Battery import(sensor.my_home_battery_import)
- Energy coming out of the battery: My Home Battery export (sensor.my_home_battery_export)
- Note: If you have multiple powerwalls you can either configure them as a single battery (shown above) or add them as separate batteries. Don't add both the summary and the individual battery or you'll be double counting. Try out both ways and see which you prefer on the dashboard.
- Battery systems
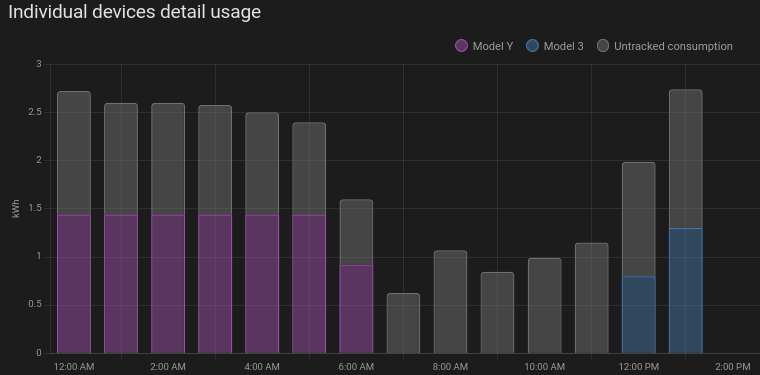
For Tesla Vehicles
- Individual Devices
- Devices: [Car Name] Charge energy added (sensor.charge_energy_added)
- Devices: [Car Name] Charge energy added (sensor.charge_energy_added)
Energy Dashboard Screenshot Examples
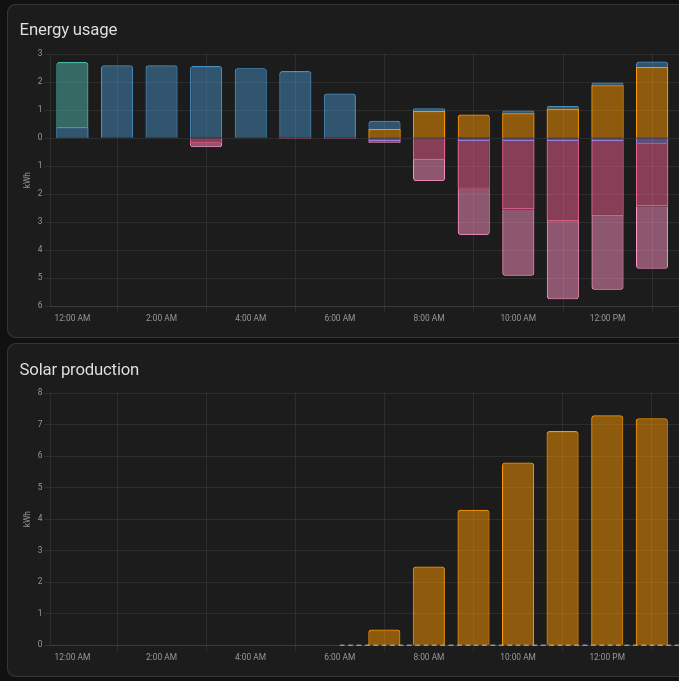
Note: The Energy distribution diagram shows total daily power (hence the kWh unit) and not instantaneous usage like the Tesla App does.
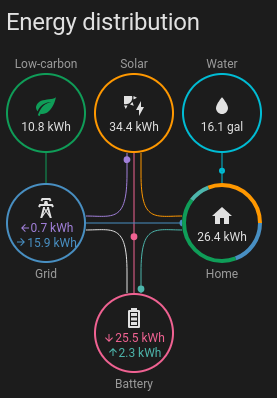
To get the "Low-carbon" indication, you also need to configure your "Grid carbon footprint" setting under "Electricity grid" in the Energy dashboard settings. This requires setting up an API key with the free "Electricity Maps" service available within Home Assistant.
Midea AC
The default Midea integration does not support most common Midea devices. To support common Midea M-Smart devices like Air conditioners, Fans, Water heaters, Washers, etc you will need to install a HACS addon (See Enable HACS if you don't have/know about that first).
Unfortunately the main "Midea AC Lan" add-on is broken and appears abandoned by the initial developer (a common problems with HACS addons). However there are a few forks which have continued development and fixed issues. The most well supported fork I have found is: https://github.com/wuwentao/midea_ac_lan
To install
Note: If install fails, make sure you did not select the other "Midea AC Lan" in HACS. It has more downloads listed, but is also broken.