Frigate NVR
The goal with a Network Video Recorder (NVR) is to free yourself from cloud subscriptions for security cameras. You can (and probably should) run a standalone NVR, but in this guide we'll setup Frigate NVR as a Home Assistant Add-On.
Equipment
To run an NVR alongside Home Assistant you will likely need more CPU power than a Raspberry Pi provides, but most mini PCs should have enough. You can always try it out and find out.
If you plan to use any detection features at all (object tracking, notifications for specific objects) then you will need some sort of hardware acceleration. The Google Coral USB Accelerator device is recommended and is what we'll cover in this guide.
The Frigate recommended hardware guide has more details on both hardware acceleration and CPU recommendations.
Cameras
See list of cameras I've tested at the bottom
You will need cameras that support RTSP and optionally ONVIF. ONVIF is needed for PTC cameras if you want Frigate to be able to control their movement. You also ideally want cameras that can output 2 streams, 1 high and 1 low resolution. High resolution will be used for viewing and the lower resolution for detection tasks.
In this guide I will be using a Tapo C210 camera which can sometimes be found on sale under $20 and supports Pan & Tilt as well as 2K resolution. Tapo cameras support RTSP and ONVIF as well as 2 different quality streams. Unfortunately they also require the Tapo app to perform the initial setup. I will be searching for other cameras that can be used entirely offline in the future and update this guide.
Setup Cameras
The first step is to setup your cameras and enable RTSP. This will vary based on the brand.
Test your camera's RTSP stream in something like VLC. The exact string will differ based on the brand, but common examples are:
rtsp://username:password192.168.0.101:554/stream1stream2 will load the low quality 720p stream.
Make sure your RTSP stream is working before moving forwardInstall Frigate
In the upper right click the 3 dots, select Repositories.
https://github.com/blakeblackshear/frigate-hass-addons and click Add
Now under the Frigate haas.io addons section, select Frigate and click Install
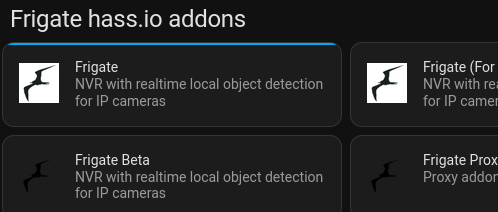
Enable the Start on boot, Watchdog, and Show in sidebar options. Click Start to start Frigate
Add-On Configuration
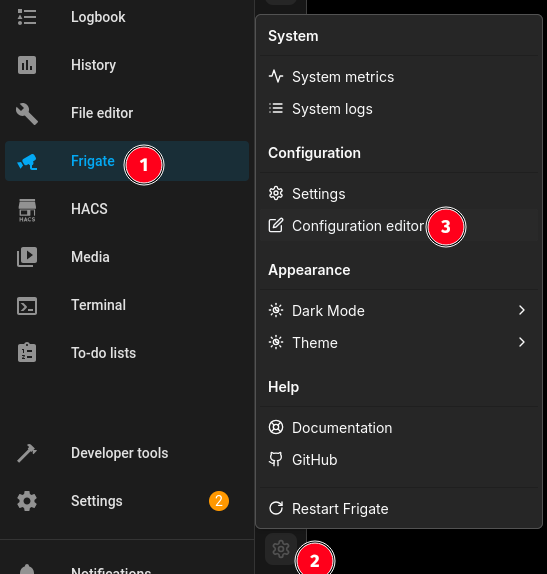
We now need to update the configuration file for Frigate to tell it about any cameras. To do that you need a way to upload or edit files in Home Assistant. If you have a favorite way, use that. For this demo I will use the File Editor built into Frigate itself.
Keep any code above and below the cameras section that is already in the config file
cameras:
  C210: # <------ Name your camera
    enabled: true
    ffmpeg:
      inputs:
        - path: rtsp://username:password@192.168.0.101:554/stream1 # The High Quality stream you want to use for recording
          roles:
            - record
        - path: rtsp://username:password@192.168.0.101:554/stream2 # The Lower Quality stream you want to use for detection
          roles:
            - detect
    detect:
      enabled: false # Disable until you have a working camera feed and hardware acceleration
      width: 1280 # The resolution of the detection camera feed.
      height: 720
      fps: 5 # This can be raised later if we have the processing power
    record:
      enabled: false
      retain:
        days: 0 # The number of days a recording will be kept for after a motion is detected
        mode: motion
      events:
        retain:
          default: 30 # The event data will be kept for 1 day. After this period, the event data will be automatically deleted.
          mode: motion
# Leave out this section if camera is not PTZ or does not support ONVIF
    onvif:
      host: 192.168.0.101
      port: 2020 # Port may differ for your camera brand!
      user: username
      password: password
      autotracking:
        enabled: false # Disable until you have hardware acceleration
        calibrate_on_startup: true
        zooming: disabled # Can enable if camera supports Zoom
        track:
          - person

    objects:
      track:
        - person
        - car

Additional Setup and usage instructions are coming soon. In the meantime go ahead and setup more cameras and play around with Frigate. You can try enabling detection in your Frigate config file, but without Hardware acceleration it may bring everything to a grinding halt.
Notifications & MQTT Integration
Coming Soon, more detailed instructions on setting up Notifications for object detection and integrating with the rest of Home Assistant
Motion Tracking
Coming Soon, more detailed instructions on setting up motion tracking and other features
Cameras Tested
Features
Works?
Notes
Tapo C210 2k, Pan & Tilt
✓
Internet Required for Setup
Tapo C110
2k, Cheap
X
Internet Required for Setup
RTSP not stable
WyzeCheap
X
No RTSP Support. Hacky workarounds available